Pages

Friday, September 6, 2013

Primitive Projectiles


There seems to be a common theme to the subjects and activities that fascinate me. Here is a brief outline of the criteria necessary:

-It needs to be reasonably involved and/or complex
-A relatively high level of skill should be involved
-I should be able to learn it on my own, or at least without much guidance
-There should be little if any probability that anyone could ever make any money doing this
-If there is any practical application to developing the skills involved, it probably has gone obsolete about a century ago

I am also apparently susceptible to, as one of my ex-girlfriends put it: "The quintessential male near-obsessive  urge to throw things".


So, considering all this, it shouldn't be too surprising that I have a long standing fascination with making and using simple range weapons (for targets). In college I started making boomerangs. Pictured here is the first one I made and still my favorite:
 Last summer I made a sling and spent hours happily flinging rocks across an empty baseball field


This year I decided that the time was right to try something I've been wanting to do for a long time: Build a Longbow. I used Red oak with a muslin backing.I finished it with Tung oil. The handle is wrapped with leather. It measures 70' nock to nock when unstrung. I have no idea what my draw weight is. Here is my bow when strung...
                                       
... and unstrung
 Here's a close-up of my top nock
 I decided that the plain muslin backing was a little dull, so I painted it.

Here's some close up of the handle and arrow shelf


I'm shooting carbon fiber arrows that were made by a company that hasn't paid me to endorse them. My quiver is made out of the leg of an old pair of khakis. Not very interesting looking, but functional. I almost showed you my target, but it looks like what it is: A large cardboard box stuffed with more cardboard with a target drawn on it.

 I did, however, make myself a nifty armguard out of scrap leather


I wanted to have a cool picture of me firing an arrow, looking all keen-eyed and dangerous-but with no one else to hold the camera, this is as close as I could get

 When I went to retrieve a stray arrow, I found this little guy. His form isn't too bad, but I think he needs to get his elbow up.

I've been practicing for a few months now. I think my aim is getting better...


Thursday, August 1, 2013

Food for thought

Here's something to consider:

Look down at your clothing. What are you wearing? Does it fit you? Is it comfortable? Did you think very much about it before you put it on, or like me, did you just pick the first items that appeared to be clean? Even if you took elaborate care and thought in choosing every item you wore- making certain your shoes offset your shirt just right, and so forth- here's something so simple and obvious that it probably never even occurred to you at the time: Every garment you are wearing was most likely made by another person. There are of course rare exceptions to this statement, but chances are even if you have made every item of your own wardrobe, it is unlikely that you also harvested the raw material, processed it, dyed it, and wove it into a cloth. These activities were all done for you by other people who you will, in all probability, never meet.

They might live on the opposite side of the world, or two houses away for all you know. Now think about the hundreds and hundreds of items you use every day, from the tools you use, to the food that you eat, to the place where you live. Every one of these things represent a moment in the life of another living person with thoughts, loves, and dreams like yours. They each have friends and family as well. They made these things for you. They most likely never knew or cared that the thing they were doing in that moment was for you. Whatever their reason for creating the object in question whether it was an exquisitely crafted piece, made with the joy of a crafts-person, or the cheapest piece of mass produced garbage produced at the end of a long shift, somebody made these things. Each and every life in this society is utterly dependent on the work of anonymous others.

If you met these people face to face, what would you say to them- The person who designed your computer, who harvested the cotton for your clothes, or made your favorite cup? Would you want to thank them, or offer criticism? What if you discovered they were the person you cut off in traffic, or the guy you smiled at in the street?
Would this change anything?

Here it is, the fact that is so massive, that it is nearly impossible to see . It is as easy to take for granted as gravity or oxygen and just as necessary for our survival:

We are all, in the most real and tangible sense, connected to every other human life on this planet. Our actions, for good or bad change the world around us in ways we can never comprehend. Regardless of belief or politics, Each and every person is an important part of our world that helps shape it into what it is, regardless of whether they understand that or not.

Taking this into consideration, don't we owe every person we meet a huge debt of gratitude? Isn't it our duty to, at very least, be kind to one another?


Under this light, the highest human aspiration would be to make the world a better place for everyone else in whatever way we can.  

Saturday, June 22, 2013

In The Details Part #2 : Casting Glances

      When building a character, I feel it is critically important to get the eyes right. It's usually the first detail anyone notices and you can convey a world of information through the eyes.In the past, I've used several different techniques to make eyes for my puppets. I've used polymer clay, ping pong balls -painted and coated with high gloss varnish, commercially made doll eyes and  even working L.E.D's to name just a few. Each of these works to good effect. Recently, though I discovered a simple and highly effective method for making resin cast eyes which has quickly become one of my favorite techniques. I'm going to show you two different variations of this method, partly so you can see the different results and partly because I'm not sure which approach will look better with my puppet.

     First you need some clear casting resin. this is available either in a two part variety, where you mix equal amounts of resin and hardener, or the kind where you add a small amount of catalyst into the resin. Either kind works fine. I'm using the two part type simply because it's what I happen to have on hand. whichever kind you use,measure and follow the mixing instructions EXACTLY as they are written. The batch I made before this one never hardened properly because I didn't stir the mixture enough.  Pay careful attention to the safety precautions and work in a well ventilated area while preparing the resin... or don't. Live your own lives, people!


 Once the mixture is ready, you can pour it into the round indentations of those cheap plastic circular palates that are available anywhere that sells art supplies. I'd suggest using new ones or having a set exclusively for this purpose. Casting resin will pick up anything it touches, so the cleaner your mold is, the better. Let the resin set for 24-48 hours (or whatever the instructions suggest). Once the resin hardens, you can crack it out, just like you would ice cubes. You'll wind up with a small pile of  nice round clear lenses. Select the ones with the fewest air bubbles and imperfections. Now the fun begins!
 Using acrylic paint, I first paint  the pupils onto the back (flat side) of the eye blanks. This process is a lot like painting on glass, you want to do the most visible details first. Notice that I've painted the pupils slightly off center. This males the eyes "cross" slightly, which gives the puppet a sharper focus. Size and shape of the pupils are also important. Our own pupils dilate when we see something or someone we like, which creates a subconscious sympathetic response in those around us. In practical character design terms, the larger the pupil, the more sympathetic the character appears. Conversely, smaller pupils make a character look more sinister and aggressive. Because I want my devil to be reasonably likable, I gave him fairly large pupils. I briefly considered giving him rectangular pupils like a goat's, but decided that round ones would be less eerie looking
I now paint the whites around the edges. this will give me a relatively clean edge around the iris. I like to let my eyes be a bit "painterly". I think it gives them a lot of personality and I don't have to worry about getting the edges perfectly round.
 Here's where I start to deviate methods. One pair of eyes will be painted entirely on  the back of the lens. this method looks sharper and usually works best for video or animals. The other pair will be painted on the curved part of another pair of lenses. When I finish, I will put the two pieces together, flat side to flat side. It creates depth and generally works great for human characters and live performance. Either way I start with my lightest color and accents. I painted a few highlights around the pupil to further help create depth. I'm going to male my irises a catlike greenish-yellow. This will stand out nicely against my devil's red skin. Incidentally, if were to paint the pupils to onto the back of the two-part eyes, the convex/concave relationship would make them appear to follow the viewer.
 After the first layer dries, I add a slightly darker yellow and light green. I find painting overlapping asterisks gives the iris a nice faceted texture.
 I add some darker accents into the empty spaces for contrast. Here I'm using a light blue to add variety to the color. I find that the more layered you make the iris, the more intelligent your character looks
 In order to fill in the remaining gaps, I paint on a golden brown-ish base coat. The eyes are starting to look a bit muddy from the back, but this doesn't matter. They will only ever be seen from the other side
 I found that the first base coat was more translucent than I wanted and that I would like more contrast, so I painted some dark brown accents.
 Finally, to fill in the remaining gaps, I add another layer of yellow ochre.
 Here are the finished results. The top pair are the one-part eyes and the bottom pair are the two-parters. Notice the difference? I attach the two pieces by either hot glue or super-glue around the edges
 I can now test them out on my puppet to see which ones work the best.
Stay tuned for the results! 

Saturday, June 15, 2013

In The Details: A Puppet Build-Along. Part #1- Head's Up!

    A lot of people ask me about my construction methods. I am always a bit hesitant to describe them. My puppet building techniques are a strange hodge-podge of things I found in books, tricks other puppeteers have shown me and things that I apparently invented. oftentimes when I am working around other puppeteers, I will do something that seems to my mind to be the only logical solution or method of handling a material only to find those around me are astonished that anyone would use that method to get those results. This comes out of trial and error more than any attempt to be innovative. As a mostly self educated puppet builder, I'm not entirely sure where what I've figured out from just playing with materials ends and traditional established technique begins
   I don't believe this is much different than any other puppeteer. To a certain extent I think we all build on what we know in our own way. In short, what I hope to demonstrate by this exercise is not how to build puppets, but how I built one particular puppet. This is intended as a demonstration rather than a tutorial. for all I know there are way better methods than mine. So far this is the best I've come up with.

Methodology:
In this demo I am building an old devil puppet for a video project I have in mind. The basic design will be a hand-and-rod puppet, similar in operation to "The Muppets", but hopefully quite different in overall effect. I know basically what I want, but I don't ordinarily work from a sketch so the process stays fresh and I allow myself to be open to discoveries. To make this post, each time I added something new, I would stop and photograph what I had just done.  I edited out some of the smaller steps for brevity's sake. I will describe my methods and thought process at each photo. Hopefully the cumulative effect will be a relatively step-by-step document of the creation of this piece.


 Materials:
-Wood, leather and fabric to make the mouth part
-A roll of 1" thick medium-firm compression poly-foam. (This is slightly denser than I ordinarily use. I thought I'd try a different compression. It woks fine.)
-Pair of very sharp scissors
-Hot glue gun  with high quality hot glue

I have recently become extremely choosy about the blend of hot glue stick that I use. Good hot glue makes a world of difference! You spend a lot less time clamping and swearing. It is more expensive to buy the really good stuff but you use less of it. I order mine online. The stuff you find at the craft stores is practically useless.


 I'm starting with the mouth blank as my base. This is simply two pieces of thin wooden board shaped and jointed with leather. The straps are also leather I may later replace them with wide elastic strips


I took a small sheet of foam and glued it to the curved edge of the lower "jaw" I want this character to have a pointy chin with a big beard, so I left it bigger than I ordinarily would.
I did the same with the top half. Note that I didn't glue my edges flush, but left a little space in the mouth. That way, if I decide to add teeth later, I'll have room


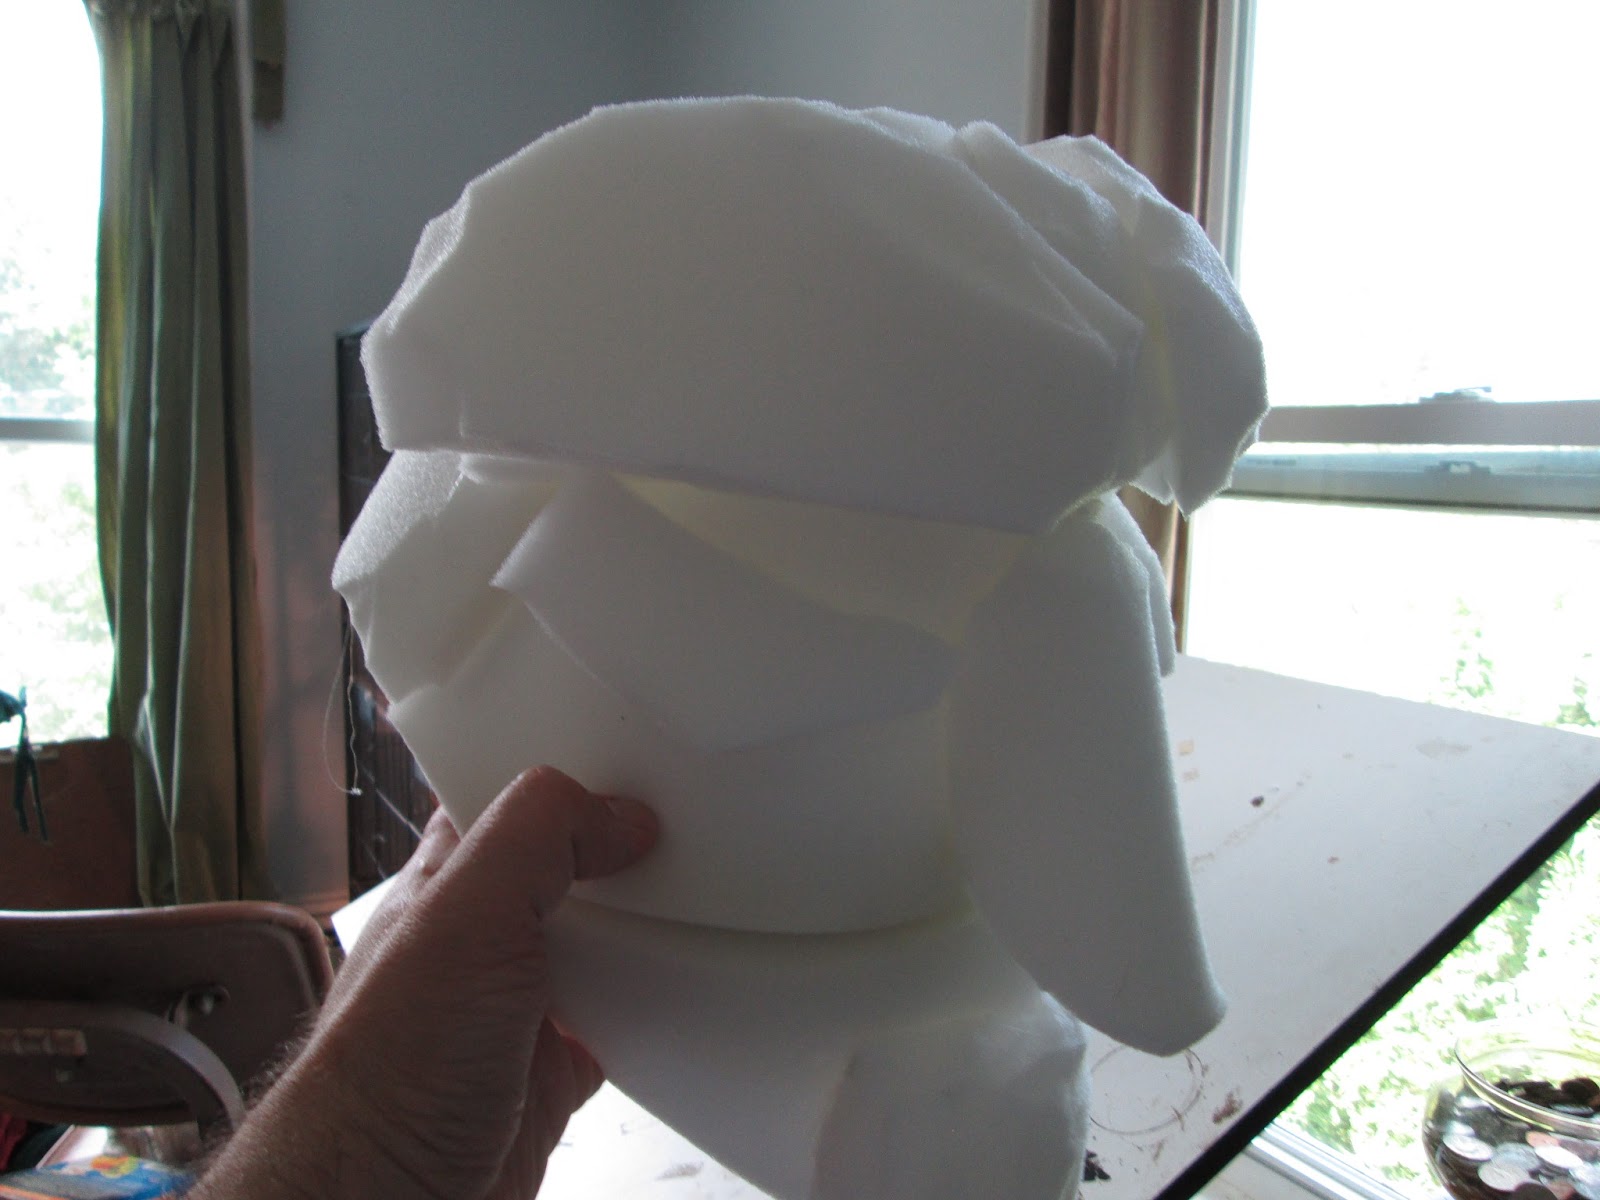
 Here I rounded the top of the head by gluing the top edges together and created a curve to the front of the skull.

 I added another piece to create the back of the head.
 I wanted the chin to stick out farther to create the character and play up the slight natural under-bite that the puppet already has, so I added another block. Later I will realize that this block is a bit crooked. I will partially correct for that, and decide that I like it slightly askew.
 Here is a closer look at the chin after I've shaped it a bit more by carving it with scissors. I use this technique a lot as you'll see.
 I folded the nose and shaped it before gluing it into place. I like to have the dominant features established first so that I can fit the rest of the face around them
 Now I shape the forehead and brows by adding another piece. I also trim the top of the nose to play up the hooked appearence

I add the cheekbones at this stage. This establishes the eye sockets. The basic planes of the face have been set at this point.

I like to have a "test eye" on hand throughout the process. It gives me a better notion of the final appearance and lets me know if my focus is where I want it. Some of you might recognize this as the heron puppet's original eye. If I don't have a spare resin cast eye around, sometimes I'll draw a pupil on a ping pong ball.
 Testing with the eye made me realize that my face was too thin, so I added another layer to the forehead...
 ...and more "meat to the sides of his face. I think he's starting to look like a grumpy old man now, but I want to play up the devil aspect. Time for horns and pointy ears. 
   I know immediately that the ears are longer than I want, but I wait until I can see them in relation to the other features

As I want an old devil, I decided that I wanted long, twisty horns like an old goat's ("Old Goat" by the way is a really fun image search!). To get the twist I wanted out of sheet foam, I had to be inventive.
 Here is one of the horns in process. I pinched the tip together and glued it into place, then I folded the foam back over itself and glued it. The foam naturally wants to spring apart and pull loose. I'm clamping it in place here. This was probably my third attempt to set it. This procedure is time consuming, frustrating and a bit difficult. I heartily recommend against it.
 I've trimmed back the ears and added a base to the horns here.
 Adding the line of the naso-labial trough adds a slight sneer to the face and sets up the location of the nostrils
 I decided to add a little hump to the bridge of the nose to make the hooked profile more dramatic
 Next I add some nostrils by bending a thin strip into place on either side. I briefly toy with the idea of adding a sharper point to the tip of the nose before trimming the bridge and deciding I don't need it. Instead, I give him a lower lip to exaggerate the under-bite and make him have a natural scowl.
 I add a strip to either side of his face to distinguish a stronger contour of the skull and add two blocks to the eyebrows. When I add hair (Hopefully long white fake fur or sheepskin, if I can find it) these will help establish the jutting set of the eyebrows.
 I wanted my character to look more grandfatherly than sinister, so I added crow's feet and kept the curve of the eyelids soft.
 This is where having the '"test eye" around really pays off

 I added the folds of the ears at this point and a few wrinkles around the bottom lip. I may decide to add some ridges on the horns later, but for now, the last three pictures are the final results of this stage


Stay tuned for more!
-J